This post is on Medium!
Saturday, March 15, 2014
Monday, October 01, 2012
VMWare ESXi update mapped to release numbers
Update to the following:
I found the holy grail of patch/update #'s to build #'s
~>~>~>~>~>~>~>~>~>~>~>~>~
Hi Internet Audience,
Perhaps this will save someone a bit of pain in trying to interpret compatibility guides when upgrading ESXi hosts (which is in my near future, and will expound upon posthumously.
Kindly LMK if you have other build #'s to map to Update or Original releases of ESXi and I will add them here. Corrections also welcome, as well please share if you find a link to this sort of table on VMWare.
ESXi version ... Update # ... Build # (as seen on the hypervisor or vCenter) & release date
4.0.0 ... Original ... 164009 2009-05-21
4.0.0 ... Pre U1 ... 171294 ???
4.0.0 ... U1 ... 208167 2009-11-19
4.1.0 ... Original (AFAIK) ... 260427
4.1.0 ... U1 ...341836 2011-02-10
4.1.0 ... U2 ... 502767 2011-10-27
4.1.0 ... U3 ... 800380 2012-08-30
5.0.0 ... Original ... 469512 2011-08-24
5.0.0 ... U1 ... 623860 2012-03-15
5.0.0 ... U1a ... 755629 2012-07-12 Release Notes
And most recently:
5.1.0 ... Original ... 799733 2012-09-10
Caveat emptor! I make no promises that this info is 100% accurate, but it should be darn close.
Monday, July 16, 2012
VMWare ESXi booting from USB ... when things go wrong
Greetings, my Internet audience,
Recently I moved my stack of not-so-new network equipment & servers to a wonderful, lovely, Ucoustic sound proof rack (which I can't say enough good things about how well it reduces machine noise, but that's a post for another day).
What you and I likely both know about moving not-so-new equipment is that there is always a risk on moving it to anywhere that something will go wrong. And predictably One of my ESXi hosts, the one containing the two office Active Directory/DNS/DHCP servers started having problems the next day, first the VM's had issues where they were only intermittently reachable by ping, VM console, Remote Desktop, or SMB, following the most annoying pattern of:
reachable by ping < 2ms for 30-40 pings
reachable by ping ~40000ms for 30-40 pings (Seriously! I mean 40 SECONDS)
unreachable by ping for about 30-40 pings
over and over and over again. Nothing in the ESXi logs for the host or VM, nothing in the Windows server system event logs. So of course I rebooted the VM. No change. Aggravating.
So I did what many before me and after me would try ... I shut down all the VM's on the ESXi host, put the ESXi host in maintenance mode, and restarted it.
Got the normal Dell bios messages about the processors, memory, the RAID controller, a battery error on the RAID controller we've been getting for a while, a message about the remote configuration utility, and then nothing. The cursor blinked annoyingly, tauntingly, but nothing.
Long story short, the USB thumb drive contained the bootable image of ESXi, and it was out of order, dead, kaput.
But all is not lost, as I first suspected! And longer story even more brief, I was able to create a new bootable ESXi USB thumb drive, boot from that, do the basic configuration (IP, network, name, gateway, DNS servers), and then logon to the ESXi host through vSphere Client & add the VM's back to inventory. As I get a moment I'll elucidate how I did this, but if you are in this position and need help, post a comment and I'll let you know how I did it.
A tad bit of useful info was found on this VMWare site, at the bottom under "Disaster Recovery" -- the one caveat I'll specify is that if you have internal disks containing VM's REMOVE them before installing ESXi on the USB thumb drive, otherwise you risk erasing those VM's that you are desperately trying to resuscitate.
Thursday, May 10, 2012
Isilon IQ 4800, how I love to hate you
A couple months ago when I started my new job, I became the intermittently proud administrator of a 4-node cluster of Isilon IQ4800's, and a 4-node cluster of Isilon IQ 6000i storage appliances.
[2011-05-11 correction: I figured out how to get restriping info out of the UI, added this to the bottom of this post]
There are a lot of things that are cool about these systems, which I won't go into detail right now, but let's just say the other day when my office lost power for a moment and I found (OH CRAP MOMENT) that the 4 node cluster of IQ 4800's were not on UPS, and one of the nodes wouldn't rejoin the cluster, yet the cluster kept on chugging, I was happy.
Until I tried to figure out what was wrong, and then I was unhappy because the documentation on these, even in the Isilon authored command reference and user guide is lacking. Isilon folks (who are now EMC), please, pretty please, when you write documentation the average Sys Admin can follow more instructions than you surmise and calling Isilon Technical Support is not a good alternative in so many examples.
Here is what I found, after connecting a serial console cable to the node that wouldn't rejoin, and how I figured out it had a failed hard drive.
First thing you may need to know, when connecting a console cable, a standard, now hard to find console cable with female to female ends, as I recall.
Baud rate: 115200
Data bits: 8
Parity: None
Stop bits: 1
Flow control: Hardware (but dtr/dsr worked for me in SecureCRT)
Using, say, a baud rate of 9600 will yield Klingon text, which I am not adept at reading, but am very annoyed by.
After skimming the dozen pages of useless commands, these are the useful ones:
isilon-cluster# isi devices
! this shows a list of hard drives and their current status
Node 1, [DOWN]
Bay 1 Lnum N/A [REPLACE] SN:N/A N/A
Bay 2 Lnum 8 [HEALTHY] SN:XXX /dev/twed3
Bay 3 Lnum 5 [HEALTHY] SN:XXX /dev/twed6
Bay 4 Lnum 2 [HEALTHY] SN:XXX /dev/twed9
Bay 5 Lnum 10 [HEALTHY] SN:XXX /dev/twed1
Bay 6 Lnum 7 [HEALTHY] SN:XXX /dev/twed4
Bay 7 Lnum 4 [HEALTHY] SN:XXX /dev/twed7
Bay 8 Lnum 1 [HEALTHY] SN:XXX /dev/twed10
Bay 9 Lnum 9 [HEALTHY] SN:XXX /dev/twed2
Bay 10 Lnum 6 [HEALTHY] SN:XXX /dev/twed5
Bay 11 Lnum 3 [HEALTHY] SN:XXX /dev/twed8
Bay 12 Lnum 0 [HEALTHY] SN:XXX /dev/twed11
Unavailable drives:
Lnum 11 [SMARTFAIL] Last Known Bay 1
isilon-cluster# # isi status -n
Node LNN: 1
Node ID: 1
Node Name: isiloncluster-1
Node IP Address: X.X.X.191
Node Health: D-------
Node SN: XXXXX
Node Capacity: n/a
Available: n/a (n/a)
Used: n/a (n/a)
Network Status:
See 'isi networks list interfaces -v' for more detail or man(8) isi.
Internal: 2 GbE network interfaces (1 up, 1 down)
External: 2 GbE network interfaces (1 up, 1 down)
1 Aggregated network interfaces (0 up, 1 down)
Disk Drive Status:
Bay 1
0b/s 0b/s 0b/s 531Kb/s
[REPLACE] [HEALTHY] [HEALTHY] [HEALTHY]
Bay 5 <10> Bay 6 <7> Bay 7 <4> Bay 8 <1>
531Kb/s 0b/s 0b/s 531Kb/s
[HEALTHY] [HEALTHY] [HEALTHY] [HEALTHY]
Bay 9 <9> Bay 10 <6> Bay 11 <3> Bay 12 <0>
0b/s 531Kb/s 0b/s 0b/s
[HEALTHY] [HEALTHY] [HEALTHY] [HEALTHY]
Okay, so based on this, I know I have a failed hard drive in Bay 1. Now how do I get a new hard drive when I 1) don't have support and 2) well, see #1. In my case, I lucked out and had a spare Isilon (yep, what are the odds?) so I cannibalized a drive out of that one, but if you don't I think the drives are SATA, just make sure it's the same size drive or larger and report back here on whether that worked. Buena suerte!
Back to the failed drive. I powered off the node using "shutdown -h now" because, guess what, under the hood this box is FreeBSD. One extra point for Isilon for using FreeBSD. There didn't seem to be an easier, obvious way to shut down the box, aside from the LED panel "shutdown" once you navigate with the arrows. Have fun with that.
So, if by chance you put in a drive that is smaller than the current ones, you may see something like [TOO SMALL] when you run "isi devices".
When I put in a used hard drive and powered on the device (there's a button on the back of the chassis, btw to power it on), running "isi devices" told me that the drive in Bay 1 was "[USED]"
Yep, it sure is! Through a bit of guessing, my coworker and I guessed how to make it less used:
Figure out what node the Isilon thinks it is:
isiloncluster-1# isi devicess --action=status --device=x:y
in my case x=1 for node 1, and y=1 for bay 1, but use this command to make sure you know which disk it is.
Then, FORMAT!
isiloncluster-1# isi devices --action=format --device=1:1
After about 15 minutes, running "isi devices" showed the drive as [HEALTHY], and after 12 hours or so, the cluster had all four nodes back online, however all the nodes in the cluster now show [ATTN] running "isi status":
isiloncluster-1# isi status
Cluster Name: isiloncluster
Cluster Health: [ATTN]
Available: 9.3T (53%)
Health Throughput (bits/s)
ID | IP Address |D-A--S-R| In Out Total | Used / Capacity
----+-----------------+--------+-------+-------+-------+-----------------------
1 | x.x.x.191 |--A-----| 0 | 0 | 0 | 2.0T / 4.3T (46%)
2 | x.x.x.192 |--A-----| 41K | 1.3M | 1.3M | 2.0T / 4.3T (46%)
3 | x.x.x.193 |--A-----| n/a | n/a | n/a | n/a / n/a (n/a)
4 | x.x.x.194 |--A-----| 0 | 0 | 0 | 2.0T / 4.3T (46%)
-------------------------------+-------+-------+-------+-----------------------
Cluster Totals: | n/a | n/a | n/a | 8.0T / 17T (46%)
Health Fields: D = Down, A = Attention, S = Smartfailed, R = Read-Only
Critical Alerts:
Finished Operations (2):
OPERATION (ID) POLICY START COMPLETE ELAPSED
FlexProtect (1) MEDIUM 05/08 17:33 05/08 20:39 3:05:55
Collect (2) LOW 05/08 20:40 05/09 06:54 10:14:37
Active Operations (1):
OPERATION (ID) POLICY START ELAPSED PCT LAST COMPLETED
AutoBalance (3) LOW 05/09 06:54 1d 7:36 0% Chunk 1120 (1000 lins, 4.1GB)
No waiting operations.
No failed operations.
After searching and searching, and no, I mean NO info in the logs, I saw the obvious. The AutoBalance command (which distributes data near-equally across all the nodes), which is supposed to run after FlexProtect (the ISI command that detects if drives or nodes fail), had been running for over a day, but was at zero percent. Running the command a few more times showed that the Chunk # was incrementing and the data size as well, but ...
A bit more digging said that I could adjust the priority of the AutoBalance command, but how?! Isilon, I beg you, tell me how?!?
Trial and error, this command did the trick:
isicluster-1# isi restripe update autobalance medium
which basically means, assign the autobalance process to the medium policy, or priority. Other useful tidbits of the isi restripe command, which has only this help info:
isicluster-1# isi restripe --help
usage: isi restripe [-wD] [action [-lda] [-n] [-o order] (operation | -i id) [-p
# isi restripe >>
Valid actions are: start, pause, stop, update, resume.
# isi restripe update >>
Valid operations are: collect, flexprotect, autobalance, mediascan, upgrade, setprotection, quotascan, treedelete, snapshotdeletelins, integrityscan, avscan.
# isi restripe update autobalance >>
Valid impact policies are: low, medium, high.
Oh, and my final thoughts:
1) This advice comes with no warranty, expressed or implied. Caveat emptor!
2) running "isi restripe" shows just the status of the restriping, without the clutter of "isi status"
3) I'm running OneFS v. 5.5.4.21
4) If you have more info than I do, please share. If you want a copy of the command reference or config guide, post here with your email and I'll send it to you.
And Buena Suerte!
2012-05-11 Addition/correction - how to get restriping info & set priorities in the web UI.
I'll admit it, I was wrong. I thought all the restriping info was not easily available or modifiable in the web UI. Here's how to do pretty much the same thing in the UI that I show above in the CLI.
In the Isilon web interface, select
File System > File System Settings > Restriper Operations
The output here is similar to what you see in the cli with "isi restripe" with an added bonus - progress is measured to one decimal point (i.e. 1.3% vs. 1% in the cli). On this page you can also modify the priority of jobs that are displayed by clicking "Edit" next to the ISI command name.
Friday, February 24, 2012
Cisco IOS to Juniper JUNOS, lost in translation
This Cisco girl, with 15 years of IOS under my belt, is now calling a Juniper shop "home."
Juniper firewall, running ScreenOS
Juniper switches, running JUNOS
Fortunately, I do have a experience with Netscreen firewalls dating back 5 years, but enough to remember that when I want the output of "show" that I need to type "get". Okay, whatever.
Being a longtime Cisco tech, I'm not a fan of GUI's. Give me a cli, I am a happy (network) girl. Show me what's under the hood, please.
Here is the one big trick I learned, not readily documented, on how to get a CLI on a Junos switch.
Assuming that ssh is setup and working, ssh to the box. I believe the default username is "root" but I could be wrong. More info forthcoming.
Then, if your environment is like mine, you'll end up at a prompt somewhat resembling this:
Try typing fun Linux commands ... vi. uname -a. You get the point. But hey, you may wonder, I just want info about my switch, where's that?
You have to type the magic command: cli
Yes, again seriously, "cli"
Then, and only then, does it look like you're administering a switch and not a FreeBSD box, version JUNOS.
Yes, sure, pick on me all you want, Juniper folks. You have not converted me yet.
Juniper firewall, running ScreenOS
Juniper switches, running JUNOS
Fortunately, I do have a experience with Netscreen firewalls dating back 5 years, but enough to remember that when I want the output of "show" that I need to type "get". Okay, whatever.
Being a longtime Cisco tech, I'm not a fan of GUI's. Give me a cli, I am a happy (network) girl. Show me what's under the hood, please.
Here is the one big trick I learned, not readily documented, on how to get a CLI on a Junos switch.
Assuming that ssh is setup and working, ssh to the box. I believe the default username is "root" but I could be wrong. More info forthcoming.
Then, if your environment is like mine, you'll end up at a prompt somewhat resembling this:
root@:RE:0%
Really? Now what? Everything I typed was useless.root@:RE:0% ?
?: No match.
root@:RE:0% help
help: Command not found.
Try typing fun Linux commands ... vi. uname -a. You get the point. But hey, you may wonder, I just want info about my switch, where's that?
You have to type the magic command: cli
Yes, again seriously, "cli"
Then, and only then, does it look like you're administering a switch and not a FreeBSD box, version JUNOS.
Yes, sure, pick on me all you want, Juniper folks. You have not converted me yet.
Friday, February 17, 2012
Recommendations on desigining a wireless network
Greetings network aficionados,
I've spent a lot of my last year designing, building, and implementing wireless networks for clients. Three clients, to be exact. Here are some lessons I learned the hard and easy way, some of which you may know already, and some not, perhaps.
I've spent a lot of my last year designing, building, and implementing wireless networks for clients. Three clients, to be exact. Here are some lessons I learned the hard and easy way, some of which you may know already, and some not, perhaps.
- Before installing a new wireless network, see how many other WLAN SSIDs are within range by doing a quick and dirty site survey - Ekahau Heatmapper is a great app to do this, and had a free version as of this posting.
Reason: In many parts of the SF Bay Area where I work, the 2.4GHz range is highly congested. This range is shared with microwave ovens, cordless phones that you'd find in someone's house, cordless conference phones (Konftel, Polycom, etc.), Bluetooth devices, Xbox, and the list goes on. If you find that there are a lot - say more than 20 or so SSID's in this range, warn your superiors that 2.4GHz is going to have issues. The 2.4Ghz range includes 802.11b/g/n. Got that, I said b/g AND the newly revered "N", but only if the AP is BGN, more on *A*GN in the next bullet. - To follow the above point, make sure, doubly sure, that your access point(s) are DUAL BAND AGN. They may say "dual band" *or* "AGN" or both. Make sure they say ONE of these. Just saying "N" is *not* good enough.
Reason: Dual band means 2.4Ghz *and* 5Ghz. GN, or BGN alone means 2.4Ghz only.
If you want better performance, at least for the clients that have 5GHz (the un-congested band, remember), the access point must support A *and* N. A+N on the box = 5Ghz. AGN on the box = 2.4Ghz (GN) *and* 5Ghz (AN) This will cost more, yes, but will save you money and headaches from listening to user complaints about wireless, because in a few months you'll have to tell your C*O that what you installed is not working because they only support 2.4Ghz, the very congested band. - On that note, check if your client devices support both bands, and make sure from now on, you only buy laptops that support both. Here's a few tips I've learned, but this info is provided with no guarantees, so do your own homework!
+ Latest gen Apple Macbooks have dual-band radios, so they support AGN. This is good.
+ Only the *latest* iPads (2.0 I believe) have dual band radios, the previous models are 2.4Ghz only
+ PC-laptops are all over the board. Check the device, check the specs, and if you're about to order and the wireless specs are vague, assume it is only 2.4Ghz and find a model that supports both. Remember it's worth the money now to save the headache (and earache from the complaints), later.
+ iPhones - 2.4Ghz only, as of this entry.
+ Androids - no clue, I don't have one, so check and update as a comment if you find out please. - If you have more than 2, and even 2 access points, get a controller. Your life will be much easier.
Reason: Managing SSID's, encryption with Pre-Shared Keys, or some kind of authorization (RADIUS, Active Directory, or otherwise) is a giant pain once you have multiple access points. The controller manages the settings on all the AP's you tell it to, so you only have to do this once. Plus, the controller can usually manage roaming between AP's in an office seamlessly, which means absence of user complaints. As I often say, in IT, no noise is good news. The other advantage is that you can often configure the controller to support guest wireless as well, on the same access points and isolate guest traffic and corporate traffic. Plus with the right controller/AP combo (yes, I'm a fan of Cisco, but have heard good refs about Aruba and Ruckus. Update with a comment if you have used these, what you think, or if there are others worth considering. - And about those access points, this is based on a lot of Cisco experience, but if your wireless environment is really congested (you did that site survey in the first bullet, right?), pay more for your access points. And you got that controller, right?
Reason: the higher-end access points in the Cisco line (and likely in the other high-end brands), have better features and give you more info about interference from other devices. RecentlyI installed a Cisco 2504 controller and 4 Cisco Aironet 3500 series AP's in an office, check out this info about what's interfering: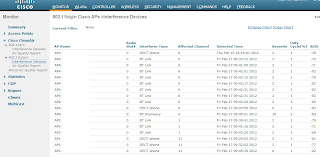
to get this info, you need Cisco access points that have the CleanAir feature, and then enable it. The low end models don't have it (of course, right?). I'm not religious about using Cisco, so let me know if the same info is available in Ruckus or Aruba. - One last bit about Power over Ethernet. PoE wireless access points are lovely, and mean that you won't need power where you place them, probably on a high wall or in the ceiling. You'll only need ethernet. Check the speed your AP supports, ideally 1Gbps, and make sure your switch is the same speed. You can use PoE adapters, but they add clutter to your IT closet, so in my (humble) opinion it's worth the cost of a PoE switch. And if you have VoIP PoE phones, there's another reason.

Friday, December 16, 2011
Cisco ASA Migrating from 8.2 to 8.4
Greetings Networkers and other readers,
Just got an ASA 5510 in to configure for a client... it shipped with the latest 8.2 release - not 8.4 release. After learning 8.4 by necessity back in April for another client, I was amused more than surprised. Those of you who have grappled with 8.4 or 8.3 likely know what I mean.
The question really is to upgrade or not to upgrade? If Cisco plans on being done with the nat 0 and nat 1 commands of the 8.2 realm, then now is the best time to upgrade. There won't be a better one, really.
So after applying a small bit of config to this new ASA, IP Addresses, nameifs, gateway, dhcpd pool, logging, commands to make ssh work, and the like, I decided to upgrade.
But I also wanted to see what 8.4 would do to my nat 1 and global statements ... so I threw these in for fun:
global (Outside) 1 interface
nat (Inside) 1 0.0.0.0 0.0.0.0
Wish I'd thrown in a few ACLs, too ...
Nevertheless ... downloaded asa842-k8.bin
Made sure there was room for both images
Backed up the current 8.2(5) image to tftp; backed up the running config to tftp
Uploaded 8.4(2) to disk0: (aka flash:)
Entered this config:
boot system disk0:/asa842-k8.bin
wr mem
reload
Here was the output (minimized):
...
Loading disk0:/asa842-k8.bin... Booting...
Platform ASA5510
...
This platform has an ASA 5510 Security Plus license.
Cisco Adaptive Security Appliance Software Version 8.4(2)
...
(all good so far)
...
Reading from flash...
!!
REAL IP MIGRATION: WARNING
In this version access-lists used in 'access-group', 'class-map',
'dynamic-filter classify-list', 'aaa match' will be migrated from
using IP address/ports as seen on interface, to their real values.
If an access-list used by these features is shared with per-user ACL
then the original access-list has to be recreated.
INFO: Note that identical IP addresses or overlapping IP ranges on
different interfaces are not detectable by automated Real IP migration.
If your deployment contains such scenarios, please verify your migrated
configuration is appropriate for those overlapping addresses/ranges.
Please also refer to the ASA 8.3 migration guide for a complete
explanation of the automated migration process.
INFO: MIGRATION - Saving the startup configuration to file
INFO: MIGRATION - Startup configuration saved to file 'flash:8_2_5_0_startup_cfg.sav'
*** Output from config line 5, "ASA Version 8.2(5) "
...
Cryptochecksum (unchanged): f02d75cc f9c78de4 a3c860ee f04eca61
NAT migration logs:
INFO: NAT migration completed.
Real IP migration logs:
No ACL was changed as part of Real-ip migration
The flash device is in use by another task.
Type help or '?' for a list of available commands.
fw01>
INFO: MIGRATION - Saving the startup errors to file 'flash:upgrade_startup_errors_201112161542.log'
DHCP Client: can't enable DHCP Client when DHCP Server/Relay is running on the interface.
DHCP: Interface 'management' is currently configured as SERVER and cannot be changed to a CLIENT by a CLIENT feature
(this last message repeated itself 7 times)
This is what happened to the nat 1 command:
object network obj_any
subnet 0.0.0.0 0.0.0.0
! --- and ----
object network obj_any
nat (Inside,Outside) dynamic interface
Not sure about the complaint about dhcp on the management interface, the config looks like before the upgrade.
Checked the error log, but it says the same thing as the above.
Monday, September 12, 2011
Comparing two MS Office Word 2007 documents
Today I discovered the most useful feature of Microsoft Office Word 2007: Compare!
When tasked with the challenge of comparing two versions of a lengthy legal document, to determine what changed, I thought for sure I was doomed to read side by side print outs (or on screen displays), or install some tool that would require converting to ascii (and then I could use 'diff', for Unix's sake!).
But Microsoft bless, I found one reason to really like Microsoft today, and that feature is called Compare.
Enough blithering, here's how it works:
Open MS Word
Choose Review > Compare
compare two versions of a single document (legal blackline)
Select the original and revised documents.
And, as if by Microsoft Magic, you'll have a list of changes between the documents.

Open MS Word 2007,
Tuesday, September 06, 2011
Protocol & network speed
Greetings, Internet audience.
Out of idle curiosity, and a plaguing question from a client about why he wasn't getting as much throughput as he expected on super-sweet gigabit Catalyst 4948 switches as he expected, meaning he expected ~600Mbps throughput, and got about 130Mpbs.
I suspected two things:
1) bandwidth limitations on the servers, meaning that a 1Gbps NIC doesn't get 1Gbps speeds on the internal BUS, and thus, won't get near 1Gbps wire speed.
2) protocol. We were testing speed using scp, and I suspected encryption was reducing the speed.
Since #2 is a bit easier for me to prove, I staged a test on my home office network, at a time I was the only one on the network.
My plan:
copy a 706330624 byte file locally, using three protocols:
scp (tcp/22), tftp (udp/69), and ftp (tcp/21)
my home network is comprised of inexpensive 10/100Mbps Netgear switches, the kind you can buy at Fry's for $30, or could a few years back, you get the point.
Note the results are in Mega "bits" per second, not Mega "bytes" per second. For MBPS, divide by 1024, or check out this handy calculator-page:
http://www.matisse.net/bitcalc/
Results:
Protocol Mbps
scp ~20Mbps
tftp ~6Mbps
ftp ~89Mbps
As you may have already figured out, the cost of encryption on network speed, is pretty high, and if you are hearing complaints about your network speed, make sure and test with FTP for the lower-protocol-overhead results. My swag as to why tftp is so slow is udp retries, but this is slower than I expected. If anyone has an opinion to add, comment away.
Thursday, June 30, 2011
DSAdd, my new best friend
When faced with the need to create 50 new users in a brand, spanking new Windows 2008 R2 Active Directory Domain, our heroine did what most hero(ines) would do ... search for a command line tool to help her out.
So I searched, and first found "ldifde" which was, essentially a giant pain in the petunia, to quote a Disney fairy.
Then I found DSADD! Oh how I love you DSADD! For those script minded folks, you can do cool things with VB scripts and excel imports using dsadd, but I was happy to copy and paste.
Here's a string that worked, btw, with identifying names and domains changed to protect the innocent and private.
dsadd user "cn=Julie Smith,ou=ABUsers,dc=mydomain,dc=local" -fn Julie -ln Smith -display "Julie Smith" -disabled no -pwd Something123 -mustchpwd yes -tel 212.555.1111 -samid ud -email julie@mydomain.com -upn julie@mydomain.local
One gotcha, that got me good. I had users in an Excel table, that I added columns and text around to create the format above, then copy/paste into Word to search out extra tabs, spaces and the like. Word got all smarty-pants on me and switched out the plain-text double quote (") with Smartie-pants quotes that wrapped around. DSAdd complained and whined about these and refused to play nice.
dsadd failed: ... :A referral was returned from the server.
This also happens if you're trying to add a user to a OU or DC that doesn't exist, btw.
p.s. with love from Microsoft
Saturday, June 18, 2011
Cisco ASA IOS 8.4 and the art of a native Windows 7 L2TP/IPSec VPN
It was a day full of IP wrangling, the day I got this to work. A sine curve kind of day full of frustrations and eventually joy. Perhaps this will save someone else a bit of agony ...
Here's a config that works on ASA software version 8.4(1) with the mind twisting new NAT syntax. The config is for IPSec clients which are Linux (using vpnc - tip of the keyboard to AI for that info), Mac OSX, and Cisco VPN Client, and also for L2TP/IPSec. Confirmed working on Windows 7, Vista, and XP Pro.
Identifying info like IP addresses, valid domain names, and the like have been scrubbed to create anonymity.
Caveat emptor, when using ADSM rather than the command line, it has a way of mucking with VPN tunnel configurations. Consider yourself warned!
Configuration required for IPSec VPN, used by Cisco VPN Client and Mac OSX, iPad, and iPhone colored orange.
Configuration required for L2TP/IPSec VPN, used by Windows XP, Vista, and 7 native clients, colored aqua.
Configuration required by both IPSec and L2TP/IPSec is in white.
…
interface Ethernet0/2
nameif Outside-ISP1
security-level 0
ip address X.X.15.2 255.255.255.248
!
interface Ethernet0/3
nameif Outside-ISP2
security-level 0
ip address Y.Y.18.86 255.255.255.248
…
object network NAT_VPN
subnet 10.1.1.0 255.255.255.0
…
access-list VPN_ROUTES standard permit 10.1.0.0 255.255.0.0
access-list VPN_ROUTES standard permit 10.2.0.0 255.255.0.0
access-list VPN_ROUTES standard permit 10.4.0.0 255.255.0.0
…
! separate pools are not needed, but it's easier to identify, you can definitely create only one
ip local pool VPN_POOL 10.1.1.11-10.1.1.40 mask 255.255.255.0
ip local pool L2TP_POOL 10.1.1.41-10.1.1.150 mask 255.255.255.0
…
! this next line is needed because the Windows client doesn't obey the split tunneling nicely, if you have multiple inside subnets, but this does mean if the VPN is connected, all traffic will go through the ASA and back out.
nat (Outside-ISP1,Outside-ISP1) source dynamic NAT_VPN interface
nat (Inside,Outside-ISP1) source static CORP_SUBNETS CORP_SUBNETS destination static NAT_VPN NAT_VPN
nat (Inside-Eng,Outside-ISP1) source static ENG_SUBNETS ENG_SUBNETS destination static NAT_VPN NAT_VPN
…
nat (Inside,Outside-ISP2) source static CORP_SUBNETS CORP_SUBNETS destination static NAT_VPN NAT_VPN
nat (Inside-Eng,Outside-ISP2) source static ENG_SUBNETS ENG_SUBNETS destination static NAT_VPN NAT_VPN
…
crypto ipsec ikev1 transform-set ESP-3DES-SHA_trans esp-3des esp-sha-hmac
crypto ipsec ikev1 transform-set ESP-3DES-SHA_trans mode transport
crypto ipsec ikev1 transform-set ESP-3DES-SHA esp-3des esp-sha-hmac
! For IPsec only, do NOT specify “mode transport”
crypto dynamic-map DynMap 1 set ikev1 transform-set ESP-3DES-SHA_trans ESP-3DES-SHA
crypto map MapVPN 100 ipsec-isakmp dynamic DynMap
crypto map MapVPN interface Outside-ISP1
crypto map MapVPN interface Outside-ISP2
crypto isakmp nat-traversal 60
crypto ikev1 enable Outside-ISP1
crypto ikev1 enable Outside-ISP2
! can probably delete policy 10 or 65535, test and report back
crypto ikev1 policy 1
authentication pre-share
encryption 3des
hash sha
group 2
lifetime 43200
crypto ikev1 policy 10
authentication pre-share
encryption 3des
hash sha
group 2
lifetime 86400
crypto ikev1 policy 20
authentication pre-share
encryption 3des
hash md5
group 2
lifetime 43200
crypto ikev1 policy 65535
authentication pre-share
encryption 3des
hash sha
group 2
lifetime 86400
…
group-policy DfltGrpPolicy attributes
vpn-simultaneous-logins 1
vpn-tunnel-protocol ikev1 l2tp-ipsec
group-policy VPNPolicy internal
group-policy VPNPolicy attributes
dns-server value 10.2.1.32
vpn-tunnel-protocol ikev1 l2tp-ipsec
split-tunnel-policy tunnelspecified
split-tunnel-network-list value VPN_ROUTES
default-domain value nonamedomain.com
group-policy VPNPolicyIpsec internal
group-policy VPNPolicyIpsec attributes
dns-server value 10.2.1.32 Public_DNS_Server_IP
vpn-idle-timeout 120
vpn-tunnel-protocol ikev1
split-tunnel-policy tunnelspecified
split-tunnel-network-list value VPN_ROUTES
default-domain value nonamedomain.com
…
! when creating new users, specify the encryption type as mschap, not as nt-encrypted so that when the account is created, the password will be converted to unicode and hashed in MD4.
username user1 password **** nt-encrypted
username user2 password **** nt-encrypted
…
! L2TP for Windows uses the DefaultRAGroup, it won't use a specific tunnel group
tunnel-group DefaultRAGroup general-attributes
address-pool L2TP_POOL
authorization-server-group LOCAL
default-group-policy VPNPolicy
tunnel-group DefaultRAGroup ipsec-attributes
ikev1 pre-shared-key ****
isakmp keepalive threshold 40 retry 5
tunnel-group DefaultRAGroup ppp-attributes
no authentication chap
no authentication ms-chap-v1
authentication ms-chap-v2
tunnel-group VPNGroupIpsec type remote-access
tunnel-group VPNGroupIpsec general-attributes
address-pool VPN_POOL
default-group-policy VPNPolicyIpsec
tunnel-group VPNGroupIpsec ipsec-attributes
ikev1 pre-shared-key ****
isakmp keepalive threshold 40 retry 5
If you want specifics on the client side setup, let me know.
Thursday, February 24, 2011
Fun at home with VMWare ESXi, CentOS netinstall, and Windows Server 2008 R2
At long last, I am building that home VMWare ESXi host, to be the home for a few OS'es, including CentOS 5, and Windows Server 2008 R2, as my personal server playgrounds.
Here are a few tips and tricks I learned along the way, that you may find useful, if you ever do this at home (try it at home, kids, it's fun and safe!).
So. The environment:
Dell PowerEdge 830 tower server which has:
4GB memory (would love to upgrade, but not willing to pay the $$)
CERC SATA RAID controller
3 x 250GB disks, RAID5 configuration
First, VMWare ESXi. I wasn't willing to install Windows OS first, and then VMWare server, so I was on a mission to figure out which ESXi version (as ESX is nowhere to be found anymore), would work on my four year old server. It wasn't 4.1, and the free version is now called VMWare VSphere Hypervisor 4.1. But the HCLs say no way Jose to my 4 year old box, so I need version 3.5, open source.
So I searched, and searched, and found a link at long last to ...
http://downloads.vmware.com/d/info/datacenter_downloads/vmware_vsphere_hypervisor_esxi/3_5
File: VMware-VMvisor-InstallerCD-3.5.0_Update_5-207095.i386.iso
Register, by the way, and you get a free license. Don't register, and VMWare will commit suicide in 60 days.
Burn that puppy to a CD, and boot from it. Installed like a charm, like a champ, configure your datastore as you will, I made all available space the datastore.
Once you get that license, add it ...
In the Virtual Infrastructure Client, select the server, click on the Configuration Tab, select "Licensed Features" and add the serial number.
I downloaded CentOS-5.5-i386-netinstall.iso so I would not have to download 5 ginormous CentOS install ISOs. LOVE netinstall!
Then I created a folder under the main datastore on the ESX host, ahem, ESXi host, so I could mount the ISO like a CD for the new VM.
On the ESX host, Configuration tab > Storage option > right click on the Datastore > Browse datastore.
Create a new folder, I called mine Distros. Open folder, click the Upload icon, and you can upload the CentOS ISO to that directory.
Then ... the fun part!
Create a new VM for CentOS, name it as you will.
In the Settings, for the CD/DVD drive, select Datastore ISO file, and browse to the ISO.
Here's the one tricky part, figuring out the server and path to the rest of the images needed by the CentOS netinstall. After browsing the many CentOS mirrors, this is what worked, which was not the path where I downloaded the netinstall ISO. Go figure.
At the root URL for the mirror, browse to some path that could look like this:
http://hostname/5.5/os/i386/
make sure that the path you specify has an /images subdirectory. That's the ticket!
Good luck here. Erroneous errors including CentOS returning extra //'s in the path that could just drive you crazy. Just look for the /images subdir, and specify the parent path.
Then ... onto Windows Server 2008 R2 install, which is, of course, 64-bit. First attempt at install gave me this lovely error ...

For search purposes, here is the main clue:
Attempting to load a 64-bit application, however this CPU is not compatible with 64-bit mode.
Say what?!
As I soon figured out, with a tip of the hat to google, there is a BIOS setting, disabled by default, that resolves this error in a jiffy.
Here's how I did it on my server:
F2 at boot, get into bios settings
CPU info
Virtualization technology > disabled by Default, change to Enabled
Reboot, and guess what? Problem solved! Windows Server 2008 R2 installed happily and easily, once I copied the ISO to the datastore as I did for CentOS. No small lovely netinstall though, MS you might want to get with the program.
Here are a few tips and tricks I learned along the way, that you may find useful, if you ever do this at home (try it at home, kids, it's fun and safe!).
So. The environment:
Dell PowerEdge 830 tower server which has:
4GB memory (would love to upgrade, but not willing to pay the $$)
CERC SATA RAID controller
3 x 250GB disks, RAID5 configuration
First, VMWare ESXi. I wasn't willing to install Windows OS first, and then VMWare server, so I was on a mission to figure out which ESXi version (as ESX is nowhere to be found anymore), would work on my four year old server. It wasn't 4.1, and the free version is now called VMWare VSphere Hypervisor 4.1. But the HCLs say no way Jose to my 4 year old box, so I need version 3.5, open source.
So I searched, and searched, and found a link at long last to ...
http://downloads.vmware.com/d/info/datacenter_downloads/vmware_vsphere_hypervisor_esxi/3_5
File: VMware-VMvisor-InstallerCD-3.5.0_Update_5-207095.i386.iso
Register, by the way, and you get a free license. Don't register, and VMWare will commit suicide in 60 days.
Burn that puppy to a CD, and boot from it. Installed like a charm, like a champ, configure your datastore as you will, I made all available space the datastore.
Once you get that license, add it ...
In the Virtual Infrastructure Client, select the server, click on the Configuration Tab, select "Licensed Features" and add the serial number.
I downloaded CentOS-5.5-i386-netinstall.iso so I would not have to download 5 ginormous CentOS install ISOs. LOVE netinstall!
Then I created a folder under the main datastore on the ESX host, ahem, ESXi host, so I could mount the ISO like a CD for the new VM.
On the ESX host, Configuration tab > Storage option > right click on the Datastore > Browse datastore.
Create a new folder, I called mine Distros. Open folder, click the Upload icon, and you can upload the CentOS ISO to that directory.
Then ... the fun part!
Create a new VM for CentOS, name it as you will.
In the Settings, for the CD/DVD drive, select Datastore ISO file, and browse to the ISO.
Here's the one tricky part, figuring out the server and path to the rest of the images needed by the CentOS netinstall. After browsing the many CentOS mirrors, this is what worked, which was not the path where I downloaded the netinstall ISO. Go figure.
At the root URL for the mirror, browse to some path that could look like this:
http://hostname
make sure that the path you specify has an /images subdirectory. That's the ticket!
Good luck here. Erroneous errors including CentOS returning extra //'s in the path that could just drive you crazy. Just look for the /images subdir, and specify the parent path.

For search purposes, here is the main clue:
Attempting to load a 64-bit application, however this CPU is not compatible with 64-bit mode.
Say what?!
As I soon figured out, with a tip of the hat to google, there is a BIOS setting, disabled by default, that resolves this error in a jiffy.
Here's how I did it on my server:
F2 at boot, get into bios settings
CPU info
Virtualization technology > disabled by Default, change to Enabled
Reboot, and guess what? Problem solved! Windows Server 2008 R2 installed happily and easily, once I copied the ISO to the datastore as I did for CentOS. No small lovely netinstall though, MS you might want to get with the program.
Tuesday, November 30, 2010
Windows XP computer thinks it's the domain master browser
One of my many Windows XP computers believes it's the Domain Master Browser, as shown in the logs on one of my Windows 2003 ADCs, as such:
System Log
Event Type: Error
Event Source: MRxSmb
Event Category: None
Event ID: 8003
Date: 11/29/2010
Time: 3:56:13 PM
User: N/A
Computer: XXXXX02
Description:
The master browser has received a server announcement from the computer XXXXXX069 that believes that it is the master browser for the domain on transport NetBT_Tcpip_{D051FAC0-5D67-4. The master browser is stopping or an election is being forced.
I checked the Computer Browser service, and it shows startup type as Automatic (as my laptop does as well), but status is Started, where mine is not.
Stopped the service, and set to Manual.
Thursday, March 19, 2009
When faced with a couple tgzaa / tgzab files ...
Yesterday I was faced with the task of how to uncompress and un-tar two files that represented the backup of a whole server that was decommissioned a few months back, the files were named as so:
vancouver.2008-09-05.2156.tgzaa
vancouver.2008-09-05.2156.tgzab
I tried:
tar xvfz vancouver.2008-09-05.2156.tgzaa vancouver.2008-09-05.2156.tgzab
but got un-friendly error messages to the effect that it wasn't going to happen. Ever.
Then I tried this, on just the first file:
tar xvfz vancouver.2008-09-05.2156.tgzaa
which uncompressed that archive, and ended with an EOF error
after pulling a dozen weeds out of my garden in frustration, a coworker found the answer:
nice -n19 cat redmond.2008-09-05.2156.tgza* gzip -dc - tar xvf -
with this explanation:
nice - to no havily load the server
cat - to join the volumes
gzip -dc - to extract
tar - to unfold the directory structure
It was the joining of the volumes I didn't know had to be done first ... tip of the pen to NF.
Subscribe to:
Posts (Atom)