Update to the following:
I found the holy grail of patch/update #'s to build #'s
~>~>~>~>~>~>~>~>~>~>~>~>~
Hi Internet Audience,
Perhaps this will save someone a bit of pain in trying to interpret compatibility guides when upgrading ESXi hosts (which is in my near future, and will expound upon posthumously.
Kindly LMK if you have other build #'s to map to Update or Original releases of ESXi and I will add them here. Corrections also welcome, as well please share if you find a link to this sort of table on VMWare.
ESXi version ... Update # ... Build # (as seen on the hypervisor or vCenter) & release date
4.0.0 ... Original ... 164009 2009-05-21
4.0.0 ... Pre U1 ... 171294 ???
4.0.0 ... U1 ... 208167 2009-11-19
4.1.0 ... Original (AFAIK) ... 260427
4.1.0 ... U1 ...341836 2011-02-10
4.1.0 ... U2 ... 502767 2011-10-27
4.1.0 ... U3 ... 800380 2012-08-30
5.0.0 ... Original ... 469512 2011-08-24
5.0.0 ... U1 ... 623860 2012-03-15
5.0.0 ... U1a ... 755629 2012-07-12 Release Notes
And most recently:
5.1.0 ... Original ... 799733 2012-09-10
Caveat emptor! I make no promises that this info is 100% accurate, but it should be darn close.
Monday, October 01, 2012
Monday, July 16, 2012
VMWare ESXi booting from USB ... when things go wrong
Greetings, my Internet audience,
Recently I moved my stack of not-so-new network equipment & servers to a wonderful, lovely, Ucoustic sound proof rack (which I can't say enough good things about how well it reduces machine noise, but that's a post for another day).
What you and I likely both know about moving not-so-new equipment is that there is always a risk on moving it to anywhere that something will go wrong. And predictably One of my ESXi hosts, the one containing the two office Active Directory/DNS/DHCP servers started having problems the next day, first the VM's had issues where they were only intermittently reachable by ping, VM console, Remote Desktop, or SMB, following the most annoying pattern of:
reachable by ping < 2ms for 30-40 pings
reachable by ping ~40000ms for 30-40 pings (Seriously! I mean 40 SECONDS)
unreachable by ping for about 30-40 pings
over and over and over again. Nothing in the ESXi logs for the host or VM, nothing in the Windows server system event logs. So of course I rebooted the VM. No change. Aggravating.
So I did what many before me and after me would try ... I shut down all the VM's on the ESXi host, put the ESXi host in maintenance mode, and restarted it.
Got the normal Dell bios messages about the processors, memory, the RAID controller, a battery error on the RAID controller we've been getting for a while, a message about the remote configuration utility, and then nothing. The cursor blinked annoyingly, tauntingly, but nothing.
Long story short, the USB thumb drive contained the bootable image of ESXi, and it was out of order, dead, kaput.
But all is not lost, as I first suspected! And longer story even more brief, I was able to create a new bootable ESXi USB thumb drive, boot from that, do the basic configuration (IP, network, name, gateway, DNS servers), and then logon to the ESXi host through vSphere Client & add the VM's back to inventory. As I get a moment I'll elucidate how I did this, but if you are in this position and need help, post a comment and I'll let you know how I did it.
A tad bit of useful info was found on this VMWare site, at the bottom under "Disaster Recovery" -- the one caveat I'll specify is that if you have internal disks containing VM's REMOVE them before installing ESXi on the USB thumb drive, otherwise you risk erasing those VM's that you are desperately trying to resuscitate.
Thursday, May 10, 2012
Isilon IQ 4800, how I love to hate you
A couple months ago when I started my new job, I became the intermittently proud administrator of a 4-node cluster of Isilon IQ4800's, and a 4-node cluster of Isilon IQ 6000i storage appliances.
[2011-05-11 correction: I figured out how to get restriping info out of the UI, added this to the bottom of this post]
There are a lot of things that are cool about these systems, which I won't go into detail right now, but let's just say the other day when my office lost power for a moment and I found (OH CRAP MOMENT) that the 4 node cluster of IQ 4800's were not on UPS, and one of the nodes wouldn't rejoin the cluster, yet the cluster kept on chugging, I was happy.
Until I tried to figure out what was wrong, and then I was unhappy because the documentation on these, even in the Isilon authored command reference and user guide is lacking. Isilon folks (who are now EMC), please, pretty please, when you write documentation the average Sys Admin can follow more instructions than you surmise and calling Isilon Technical Support is not a good alternative in so many examples.
Here is what I found, after connecting a serial console cable to the node that wouldn't rejoin, and how I figured out it had a failed hard drive.
First thing you may need to know, when connecting a console cable, a standard, now hard to find console cable with female to female ends, as I recall.
Baud rate: 115200
Data bits: 8
Parity: None
Stop bits: 1
Flow control: Hardware (but dtr/dsr worked for me in SecureCRT)
Using, say, a baud rate of 9600 will yield Klingon text, which I am not adept at reading, but am very annoyed by.
After skimming the dozen pages of useless commands, these are the useful ones:
isilon-cluster# isi devices
! this shows a list of hard drives and their current status
Node 1, [DOWN]
Bay 1 Lnum N/A [REPLACE] SN:N/A N/A
Bay 2 Lnum 8 [HEALTHY] SN:XXX /dev/twed3
Bay 3 Lnum 5 [HEALTHY] SN:XXX /dev/twed6
Bay 4 Lnum 2 [HEALTHY] SN:XXX /dev/twed9
Bay 5 Lnum 10 [HEALTHY] SN:XXX /dev/twed1
Bay 6 Lnum 7 [HEALTHY] SN:XXX /dev/twed4
Bay 7 Lnum 4 [HEALTHY] SN:XXX /dev/twed7
Bay 8 Lnum 1 [HEALTHY] SN:XXX /dev/twed10
Bay 9 Lnum 9 [HEALTHY] SN:XXX /dev/twed2
Bay 10 Lnum 6 [HEALTHY] SN:XXX /dev/twed5
Bay 11 Lnum 3 [HEALTHY] SN:XXX /dev/twed8
Bay 12 Lnum 0 [HEALTHY] SN:XXX /dev/twed11
Unavailable drives:
Lnum 11 [SMARTFAIL] Last Known Bay 1
isilon-cluster# # isi status -n
Node LNN: 1
Node ID: 1
Node Name: isiloncluster-1
Node IP Address: X.X.X.191
Node Health: D-------
Node SN: XXXXX
Node Capacity: n/a
Available: n/a (n/a)
Used: n/a (n/a)
Network Status:
See 'isi networks list interfaces -v' for more detail or man(8) isi.
Internal: 2 GbE network interfaces (1 up, 1 down)
External: 2 GbE network interfaces (1 up, 1 down)
1 Aggregated network interfaces (0 up, 1 down)
Disk Drive Status:
Bay 1
0b/s 0b/s 0b/s 531Kb/s
[REPLACE] [HEALTHY] [HEALTHY] [HEALTHY]
Bay 5 <10> Bay 6 <7> Bay 7 <4> Bay 8 <1>
531Kb/s 0b/s 0b/s 531Kb/s
[HEALTHY] [HEALTHY] [HEALTHY] [HEALTHY]
Bay 9 <9> Bay 10 <6> Bay 11 <3> Bay 12 <0>
0b/s 531Kb/s 0b/s 0b/s
[HEALTHY] [HEALTHY] [HEALTHY] [HEALTHY]
Okay, so based on this, I know I have a failed hard drive in Bay 1. Now how do I get a new hard drive when I 1) don't have support and 2) well, see #1. In my case, I lucked out and had a spare Isilon (yep, what are the odds?) so I cannibalized a drive out of that one, but if you don't I think the drives are SATA, just make sure it's the same size drive or larger and report back here on whether that worked. Buena suerte!
Back to the failed drive. I powered off the node using "shutdown -h now" because, guess what, under the hood this box is FreeBSD. One extra point for Isilon for using FreeBSD. There didn't seem to be an easier, obvious way to shut down the box, aside from the LED panel "shutdown" once you navigate with the arrows. Have fun with that.
So, if by chance you put in a drive that is smaller than the current ones, you may see something like [TOO SMALL] when you run "isi devices".
When I put in a used hard drive and powered on the device (there's a button on the back of the chassis, btw to power it on), running "isi devices" told me that the drive in Bay 1 was "[USED]"
Yep, it sure is! Through a bit of guessing, my coworker and I guessed how to make it less used:
Figure out what node the Isilon thinks it is:
isiloncluster-1# isi devicess --action=status --device=x:y
in my case x=1 for node 1, and y=1 for bay 1, but use this command to make sure you know which disk it is.
Then, FORMAT!
isiloncluster-1# isi devices --action=format --device=1:1
After about 15 minutes, running "isi devices" showed the drive as [HEALTHY], and after 12 hours or so, the cluster had all four nodes back online, however all the nodes in the cluster now show [ATTN] running "isi status":
isiloncluster-1# isi status
Cluster Name: isiloncluster
Cluster Health: [ATTN]
Available: 9.3T (53%)
Health Throughput (bits/s)
ID | IP Address |D-A--S-R| In Out Total | Used / Capacity
----+-----------------+--------+-------+-------+-------+-----------------------
1 | x.x.x.191 |--A-----| 0 | 0 | 0 | 2.0T / 4.3T (46%)
2 | x.x.x.192 |--A-----| 41K | 1.3M | 1.3M | 2.0T / 4.3T (46%)
3 | x.x.x.193 |--A-----| n/a | n/a | n/a | n/a / n/a (n/a)
4 | x.x.x.194 |--A-----| 0 | 0 | 0 | 2.0T / 4.3T (46%)
-------------------------------+-------+-------+-------+-----------------------
Cluster Totals: | n/a | n/a | n/a | 8.0T / 17T (46%)
Health Fields: D = Down, A = Attention, S = Smartfailed, R = Read-Only
Critical Alerts:
Finished Operations (2):
OPERATION (ID) POLICY START COMPLETE ELAPSED
FlexProtect (1) MEDIUM 05/08 17:33 05/08 20:39 3:05:55
Collect (2) LOW 05/08 20:40 05/09 06:54 10:14:37
Active Operations (1):
OPERATION (ID) POLICY START ELAPSED PCT LAST COMPLETED
AutoBalance (3) LOW 05/09 06:54 1d 7:36 0% Chunk 1120 (1000 lins, 4.1GB)
No waiting operations.
No failed operations.
After searching and searching, and no, I mean NO info in the logs, I saw the obvious. The AutoBalance command (which distributes data near-equally across all the nodes), which is supposed to run after FlexProtect (the ISI command that detects if drives or nodes fail), had been running for over a day, but was at zero percent. Running the command a few more times showed that the Chunk # was incrementing and the data size as well, but ...
A bit more digging said that I could adjust the priority of the AutoBalance command, but how?! Isilon, I beg you, tell me how?!?
Trial and error, this command did the trick:
isicluster-1# isi restripe update autobalance medium
which basically means, assign the autobalance process to the medium policy, or priority. Other useful tidbits of the isi restripe command, which has only this help info:
isicluster-1# isi restripe --help
usage: isi restripe [-wD] [action [-lda] [-n] [-o order] (operation | -i id) [-p
# isi restripe >>
Valid actions are: start, pause, stop, update, resume.
# isi restripe update >>
Valid operations are: collect, flexprotect, autobalance, mediascan, upgrade, setprotection, quotascan, treedelete, snapshotdeletelins, integrityscan, avscan.
# isi restripe update autobalance >>
Valid impact policies are: low, medium, high.
Oh, and my final thoughts:
1) This advice comes with no warranty, expressed or implied. Caveat emptor!
2) running "isi restripe" shows just the status of the restriping, without the clutter of "isi status"
3) I'm running OneFS v. 5.5.4.21
4) If you have more info than I do, please share. If you want a copy of the command reference or config guide, post here with your email and I'll send it to you.
And Buena Suerte!
2012-05-11 Addition/correction - how to get restriping info & set priorities in the web UI.
I'll admit it, I was wrong. I thought all the restriping info was not easily available or modifiable in the web UI. Here's how to do pretty much the same thing in the UI that I show above in the CLI.
In the Isilon web interface, select
File System > File System Settings > Restriper Operations
The output here is similar to what you see in the cli with "isi restripe" with an added bonus - progress is measured to one decimal point (i.e. 1.3% vs. 1% in the cli). On this page you can also modify the priority of jobs that are displayed by clicking "Edit" next to the ISI command name.
Friday, February 24, 2012
Cisco IOS to Juniper JUNOS, lost in translation
This Cisco girl, with 15 years of IOS under my belt, is now calling a Juniper shop "home."
Juniper firewall, running ScreenOS
Juniper switches, running JUNOS
Fortunately, I do have a experience with Netscreen firewalls dating back 5 years, but enough to remember that when I want the output of "show" that I need to type "get". Okay, whatever.
Being a longtime Cisco tech, I'm not a fan of GUI's. Give me a cli, I am a happy (network) girl. Show me what's under the hood, please.
Here is the one big trick I learned, not readily documented, on how to get a CLI on a Junos switch.
Assuming that ssh is setup and working, ssh to the box. I believe the default username is "root" but I could be wrong. More info forthcoming.
Then, if your environment is like mine, you'll end up at a prompt somewhat resembling this:
Try typing fun Linux commands ... vi. uname -a. You get the point. But hey, you may wonder, I just want info about my switch, where's that?
You have to type the magic command: cli
Yes, again seriously, "cli"
Then, and only then, does it look like you're administering a switch and not a FreeBSD box, version JUNOS.
Yes, sure, pick on me all you want, Juniper folks. You have not converted me yet.
Juniper firewall, running ScreenOS
Juniper switches, running JUNOS
Fortunately, I do have a experience with Netscreen firewalls dating back 5 years, but enough to remember that when I want the output of "show" that I need to type "get". Okay, whatever.
Being a longtime Cisco tech, I'm not a fan of GUI's. Give me a cli, I am a happy (network) girl. Show me what's under the hood, please.
Here is the one big trick I learned, not readily documented, on how to get a CLI on a Junos switch.
Assuming that ssh is setup and working, ssh to the box. I believe the default username is "root" but I could be wrong. More info forthcoming.
Then, if your environment is like mine, you'll end up at a prompt somewhat resembling this:
root@:RE:0%
Really? Now what? Everything I typed was useless.root@:RE:0% ?
?: No match.
root@:RE:0% help
help: Command not found.
Try typing fun Linux commands ... vi. uname -a. You get the point. But hey, you may wonder, I just want info about my switch, where's that?
You have to type the magic command: cli
Yes, again seriously, "cli"
Then, and only then, does it look like you're administering a switch and not a FreeBSD box, version JUNOS.
Yes, sure, pick on me all you want, Juniper folks. You have not converted me yet.
Friday, February 17, 2012
Recommendations on desigining a wireless network
Greetings network aficionados,
I've spent a lot of my last year designing, building, and implementing wireless networks for clients. Three clients, to be exact. Here are some lessons I learned the hard and easy way, some of which you may know already, and some not, perhaps.
I've spent a lot of my last year designing, building, and implementing wireless networks for clients. Three clients, to be exact. Here are some lessons I learned the hard and easy way, some of which you may know already, and some not, perhaps.
- Before installing a new wireless network, see how many other WLAN SSIDs are within range by doing a quick and dirty site survey - Ekahau Heatmapper is a great app to do this, and had a free version as of this posting.
Reason: In many parts of the SF Bay Area where I work, the 2.4GHz range is highly congested. This range is shared with microwave ovens, cordless phones that you'd find in someone's house, cordless conference phones (Konftel, Polycom, etc.), Bluetooth devices, Xbox, and the list goes on. If you find that there are a lot - say more than 20 or so SSID's in this range, warn your superiors that 2.4GHz is going to have issues. The 2.4Ghz range includes 802.11b/g/n. Got that, I said b/g AND the newly revered "N", but only if the AP is BGN, more on *A*GN in the next bullet. - To follow the above point, make sure, doubly sure, that your access point(s) are DUAL BAND AGN. They may say "dual band" *or* "AGN" or both. Make sure they say ONE of these. Just saying "N" is *not* good enough.
Reason: Dual band means 2.4Ghz *and* 5Ghz. GN, or BGN alone means 2.4Ghz only.
If you want better performance, at least for the clients that have 5GHz (the un-congested band, remember), the access point must support A *and* N. A+N on the box = 5Ghz. AGN on the box = 2.4Ghz (GN) *and* 5Ghz (AN) This will cost more, yes, but will save you money and headaches from listening to user complaints about wireless, because in a few months you'll have to tell your C*O that what you installed is not working because they only support 2.4Ghz, the very congested band. - On that note, check if your client devices support both bands, and make sure from now on, you only buy laptops that support both. Here's a few tips I've learned, but this info is provided with no guarantees, so do your own homework!
+ Latest gen Apple Macbooks have dual-band radios, so they support AGN. This is good.
+ Only the *latest* iPads (2.0 I believe) have dual band radios, the previous models are 2.4Ghz only
+ PC-laptops are all over the board. Check the device, check the specs, and if you're about to order and the wireless specs are vague, assume it is only 2.4Ghz and find a model that supports both. Remember it's worth the money now to save the headache (and earache from the complaints), later.
+ iPhones - 2.4Ghz only, as of this entry.
+ Androids - no clue, I don't have one, so check and update as a comment if you find out please. - If you have more than 2, and even 2 access points, get a controller. Your life will be much easier.
Reason: Managing SSID's, encryption with Pre-Shared Keys, or some kind of authorization (RADIUS, Active Directory, or otherwise) is a giant pain once you have multiple access points. The controller manages the settings on all the AP's you tell it to, so you only have to do this once. Plus, the controller can usually manage roaming between AP's in an office seamlessly, which means absence of user complaints. As I often say, in IT, no noise is good news. The other advantage is that you can often configure the controller to support guest wireless as well, on the same access points and isolate guest traffic and corporate traffic. Plus with the right controller/AP combo (yes, I'm a fan of Cisco, but have heard good refs about Aruba and Ruckus. Update with a comment if you have used these, what you think, or if there are others worth considering. - And about those access points, this is based on a lot of Cisco experience, but if your wireless environment is really congested (you did that site survey in the first bullet, right?), pay more for your access points. And you got that controller, right?
Reason: the higher-end access points in the Cisco line (and likely in the other high-end brands), have better features and give you more info about interference from other devices. RecentlyI installed a Cisco 2504 controller and 4 Cisco Aironet 3500 series AP's in an office, check out this info about what's interfering: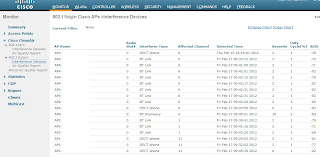
to get this info, you need Cisco access points that have the CleanAir feature, and then enable it. The low end models don't have it (of course, right?). I'm not religious about using Cisco, so let me know if the same info is available in Ruckus or Aruba. - One last bit about Power over Ethernet. PoE wireless access points are lovely, and mean that you won't need power where you place them, probably on a high wall or in the ceiling. You'll only need ethernet. Check the speed your AP supports, ideally 1Gbps, and make sure your switch is the same speed. You can use PoE adapters, but they add clutter to your IT closet, so in my (humble) opinion it's worth the cost of a PoE switch. And if you have VoIP PoE phones, there's another reason.

Subscribe to:
Posts (Atom)